> ## Documentation Index
> Fetch the complete documentation index at: https://langchain-5e9cc07a-preview-change-1791323909-75c753a.mintlify.site/llms.txt
> Use this file to discover all available pages before exploring further.
# Deploy your app to cloud
> Deploy your first application to LangSmith Cloud in GCP using the LangGraph CLI.
This quickstart shows you how to deploy an application to LangSmith Cloud in GCP using the [`langgraph deploy`](/langsmith/cli#deploy) command. Any app that exports a graph from a [`langgraph.json`](/langsmith/application-structure#configuration-file-concepts) config deploys the same way, regardless of which framework you used to author the agent.
For a comprehensive Cloud deployment guide including GitHub-based deployments and all configuration options, refer to the [Cloud deployment setup guide](/langsmith/deploy-to-cloud).
The `langgraph deploy` command is in **[beta](/langsmith/release-stages)**. `langgraph deploy` is not yet supported on LangSmith Cloud (SaaS) in AWS.
## Prerequisites
Before you begin, ensure you have:
* A [LangSmith account](https://smith.langchain.com?utm_source=docs\&utm_medium=cta\&utm_campaign=langsmith-signup\&utm_content=langsmith-deployment-quickstart) on the [Plus plan or above](https://www.langchain.com/pricing) and an [API key](/langsmith/create-account-api-key).
* (Optional) **Docker** installed and the Docker daemon running for local builds. Not required for remote builds. [Install Docker Desktop](https://docs.docker.com/get-docker/). If Docker is not available, `langgraph deploy` triggers a remote build automatically.
* (Optional) On Apple Silicon (M1/M2/M3): [Docker Buildx](https://docs.docker.com/build/install-buildx/) for cross-compiling to `linux/amd64` during local builds.
* The [LangGraph CLI](/langsmith/cli):
```shell theme={null}
uv tool install langgraph-cli
```
## 1. Create a deployable app
`langgraph deploy` deploys any project whose `langgraph.json` exports a graph. Pick the path that matches how you author your agent:
Create a new app from the [`new-langgraph-project-python` template](https://github.com/langchain-ai/new-langgraph-project):
```shell theme={null}
langgraph new path/to/your/app --template new-langgraph-project-python
cd path/to/your/app
```
Run `langgraph new` without `--template` for an interactive menu of available templates.
Agents authored with Claude Agent SDK, Strands, CrewAI, AutoGen, or Google ADK deploy through the same CLI once they expose a graph from `langgraph.json`. For end-to-end examples, see [Deploy other frameworks](/langsmith/deploy-other-frameworks). Once your project exports a graph, return here for the remaining steps.
## 2. Set your API key
Add your LangSmith API key to a `.env` file in your project root:
```shell theme={null}
LANGSMITH_API_KEY=lsv2_...
```
The `langgraph deploy` command reads this automatically. Alternatively, pass it inline:
```shell theme={null}
LANGSMITH_API_KEY=lsv2_... langgraph deploy
```
## 3. Deploy
Deploy directly from the CLI or via the UI.
Run the deploy command from your project directory:
```shell theme={null}
langgraph deploy
```
This creates a Serverless deployment named after your project directory by default. Use `--name` or `--deployment-type dedicated` to override.
Organizations still on previous pricing until October 1, 2026 use `--deployment-type prod` or `--deployment-type dev` instead. For details, see [`langgraph deploy`](/langsmith/cli#deploy) and [Manage billing](/langsmith/billing#langsmith-deployment-billing).
To update an existing deployment after making code changes, re-run `langgraph deploy`. It finds the existing deployment by name and updates it in place.
You can also use `langgraph deploy list` to see all deployments, `langgraph deploy logs` to tail runtime logs, and `langgraph deploy delete ` to remove a deployment. For details, refer to the [CLI reference](/langsmith/cli#deploy).
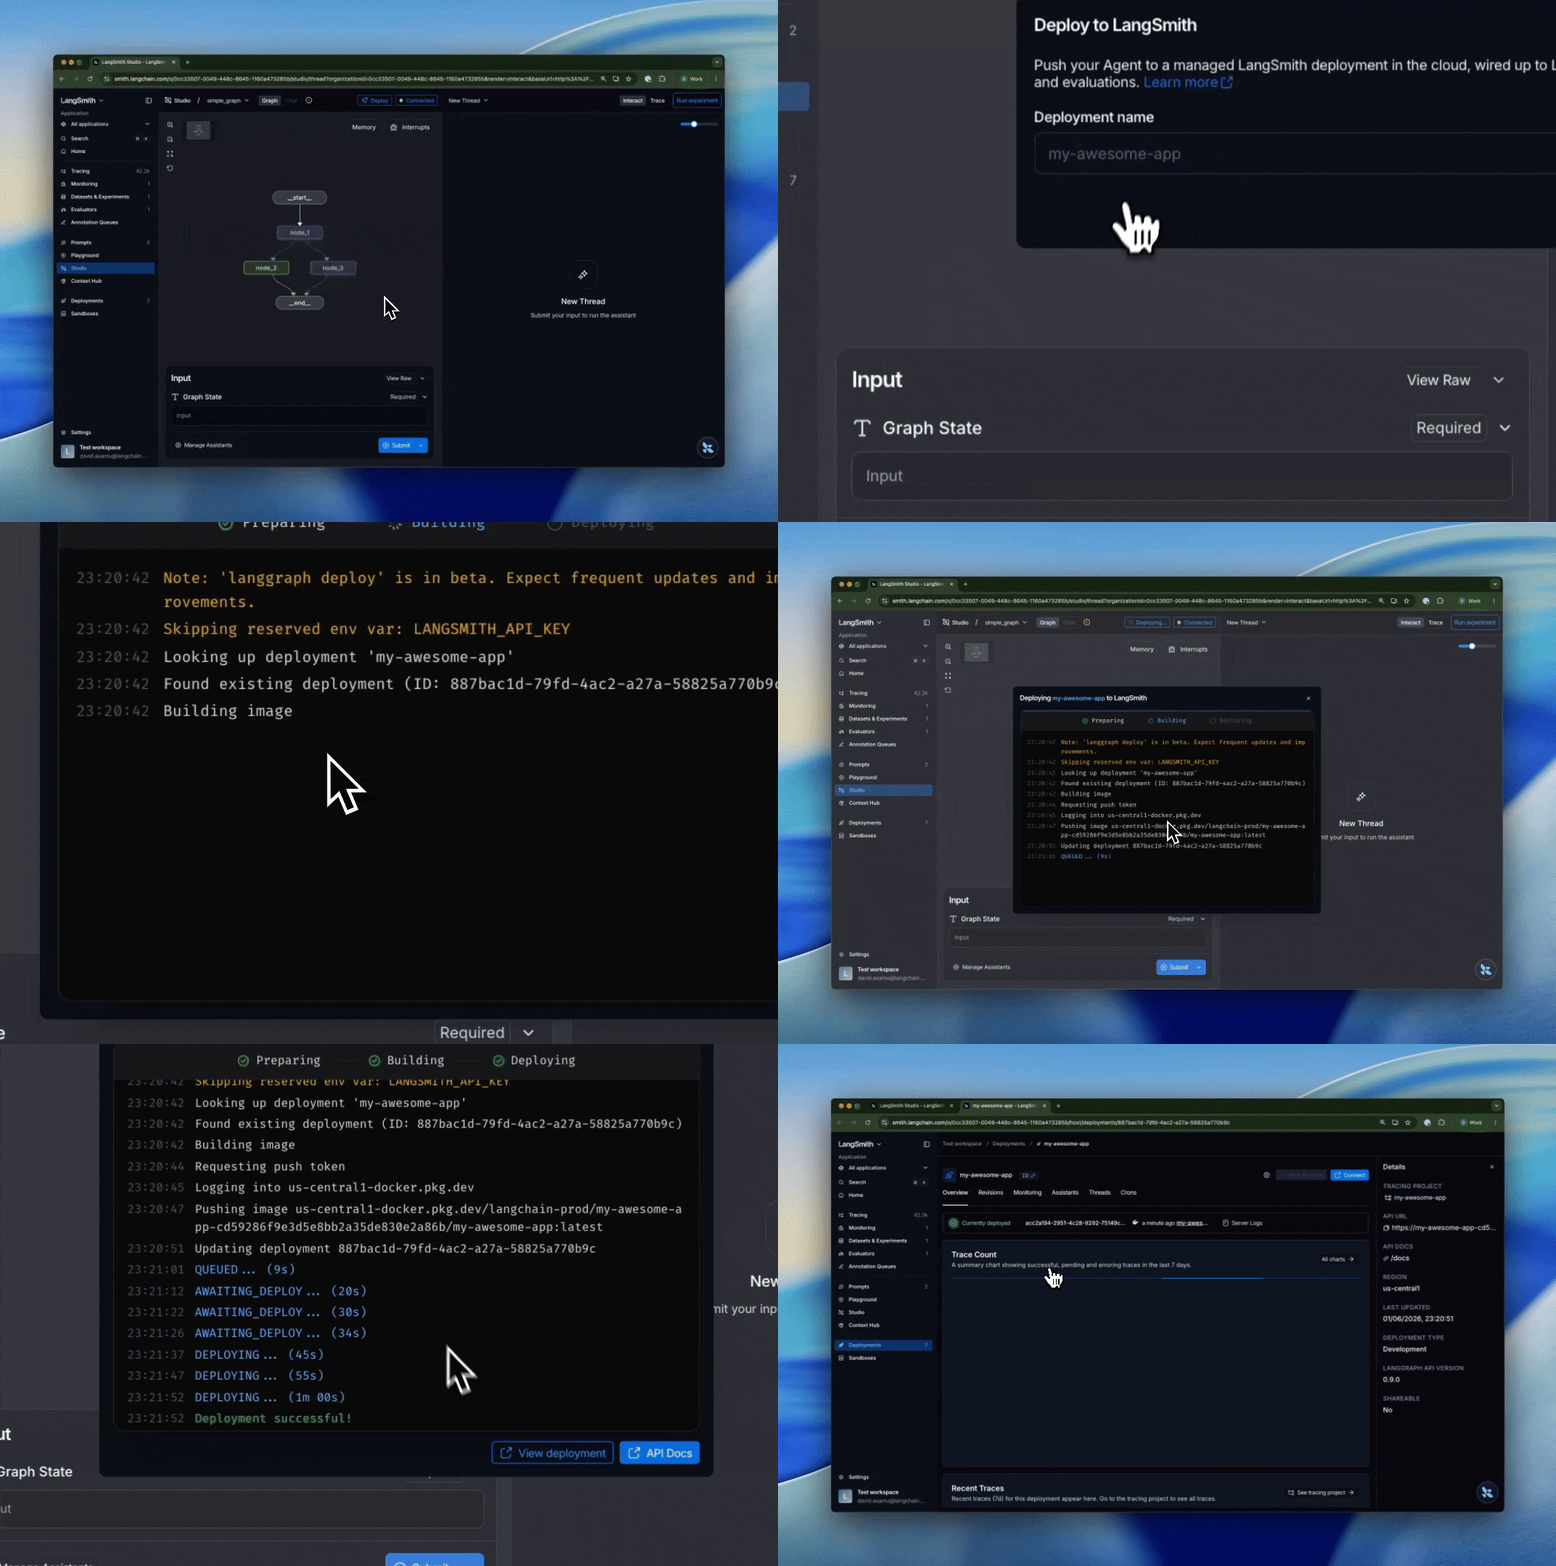
To deploy from studio:
1. Start the [local development server](/langsmith/local-dev-testing#langgraph-dev). This will automatically open up [Studio](/langsmith/studio), an interactive agent IDE.
```shell theme={null}
langgraph dev
```
2. Click the `deploy` button.
 ## 4. Test in Studio
[Studio](/langsmith/studio) is an interactive agent IDE connected directly to your deployment. Use it to send messages, inspect intermediate state at each node, edit state mid-run, and replay from any prior checkpoint without writing code.
Once the deployment is ready:
1. Go to [LangSmith](https://smith.langchain.com?utm_source=docs\&utm_medium=cta\&utm_campaign=langsmith-signup\&utm_content=langsmith-deployment-quickstart) and select **Deployments** in the left sidebar.
2. Select your deployment to view its details.
3. Click **Studio** in the top right corner to open [Studio](/langsmith/studio).
## 5. Test the API
Copy the **API URL** from the deployment details view, then use it to call your application:
1. Install the LangGraph Python SDK:
```shell theme={null}
pip install langgraph-sdk
```
2. Send a message to the assistant (stateless run):
```python theme={null}
from langgraph_sdk import get_client
client = get_client(url="your-deployment-url", api_key="your-langsmith-api-key")
async for chunk in client.runs.stream(
None, # Threadless run
"agent", # Name of assistant. Defined in langgraph.json.
input={
"messages": [{
"role": "human",
"content": "Say hello.",
}],
},
stream_mode="updates",
):
print(f"Receiving new event of type: {chunk.event}...")
print(chunk.data)
print("\n\n")
```
1. Install the LangGraph Python SDK:
```shell theme={null}
pip install langgraph-sdk
```
2. Send a message to the assistant (threadless run):
```python theme={null}
from langgraph_sdk import get_sync_client
client = get_sync_client(url="your-deployment-url", api_key="your-langsmith-api-key")
for chunk in client.runs.stream(
None, # Threadless run
"agent", # Name of assistant. Defined in langgraph.json.
input={
"messages": [{
"role": "human",
"content": "Say hello.",
}],
},
stream_mode="updates",
):
print(f"Receiving new event of type: {chunk.event}...")
print(chunk.data)
print("\n\n")
```
1. Install the LangGraph JS SDK:
```shell theme={null}
npm install @langchain/langgraph-sdk
```
2. Send a message to the assistant (threadless run):
```js theme={null}
const { Client } = await import("@langchain/langgraph-sdk");
const client = new Client({ apiUrl: "your-deployment-url", apiKey: "your-langsmith-api-key" });
const streamResponse = client.runs.stream(
null, // Threadless run
"agent", // Assistant ID
{
input: {
"messages": [
{ "role": "user", "content": "Say hello."}
]
},
streamMode: "messages",
}
);
for await (const chunk of streamResponse) {
console.log(`Receiving new event of type: ${chunk.event}...`);
console.log(JSON.stringify(chunk.data));
console.log("\n\n");
}
```
```bash theme={null}
curl -s --request POST \
--url /runs/stream \
--header 'Content-Type: application/json' \
--header "X-Api-Key: " \
--data "{
\"assistant_id\": \"agent\",
\"input\": {
\"messages\": [
{
\"role\": \"human\",
\"content\": \"Say hello.\"
}
]
},
\"stream_mode\": \"updates\"
}"
```
## Next steps
Deploy the same graph with different models, prompts, or tools per assistant.
Persist state across multiple runs so your agent remembers context between interactions.
Kick off background runs for long-running jobs and stream results back to your client.
***
## 4. Test in Studio
[Studio](/langsmith/studio) is an interactive agent IDE connected directly to your deployment. Use it to send messages, inspect intermediate state at each node, edit state mid-run, and replay from any prior checkpoint without writing code.
Once the deployment is ready:
1. Go to [LangSmith](https://smith.langchain.com?utm_source=docs\&utm_medium=cta\&utm_campaign=langsmith-signup\&utm_content=langsmith-deployment-quickstart) and select **Deployments** in the left sidebar.
2. Select your deployment to view its details.
3. Click **Studio** in the top right corner to open [Studio](/langsmith/studio).
## 5. Test the API
Copy the **API URL** from the deployment details view, then use it to call your application:
1. Install the LangGraph Python SDK:
```shell theme={null}
pip install langgraph-sdk
```
2. Send a message to the assistant (stateless run):
```python theme={null}
from langgraph_sdk import get_client
client = get_client(url="your-deployment-url", api_key="your-langsmith-api-key")
async for chunk in client.runs.stream(
None, # Threadless run
"agent", # Name of assistant. Defined in langgraph.json.
input={
"messages": [{
"role": "human",
"content": "Say hello.",
}],
},
stream_mode="updates",
):
print(f"Receiving new event of type: {chunk.event}...")
print(chunk.data)
print("\n\n")
```
1. Install the LangGraph Python SDK:
```shell theme={null}
pip install langgraph-sdk
```
2. Send a message to the assistant (threadless run):
```python theme={null}
from langgraph_sdk import get_sync_client
client = get_sync_client(url="your-deployment-url", api_key="your-langsmith-api-key")
for chunk in client.runs.stream(
None, # Threadless run
"agent", # Name of assistant. Defined in langgraph.json.
input={
"messages": [{
"role": "human",
"content": "Say hello.",
}],
},
stream_mode="updates",
):
print(f"Receiving new event of type: {chunk.event}...")
print(chunk.data)
print("\n\n")
```
1. Install the LangGraph JS SDK:
```shell theme={null}
npm install @langchain/langgraph-sdk
```
2. Send a message to the assistant (threadless run):
```js theme={null}
const { Client } = await import("@langchain/langgraph-sdk");
const client = new Client({ apiUrl: "your-deployment-url", apiKey: "your-langsmith-api-key" });
const streamResponse = client.runs.stream(
null, // Threadless run
"agent", // Assistant ID
{
input: {
"messages": [
{ "role": "user", "content": "Say hello."}
]
},
streamMode: "messages",
}
);
for await (const chunk of streamResponse) {
console.log(`Receiving new event of type: ${chunk.event}...`);
console.log(JSON.stringify(chunk.data));
console.log("\n\n");
}
```
```bash theme={null}
curl -s --request POST \
--url /runs/stream \
--header 'Content-Type: application/json' \
--header "X-Api-Key: " \
--data "{
\"assistant_id\": \"agent\",
\"input\": {
\"messages\": [
{
\"role\": \"human\",
\"content\": \"Say hello.\"
}
]
},
\"stream_mode\": \"updates\"
}"
```
## Next steps
Deploy the same graph with different models, prompts, or tools per assistant.
Persist state across multiple runs so your agent remembers context between interactions.
Kick off background runs for long-running jobs and stream results back to your client.
***
[Connect these docs](/use-these-docs) to your agent of choice via MCP for real-time answers.
[Edit this page on GitHub](https://github.com/langchain-ai/docs/edit/main/src/langsmith/deployment-quickstart.mdx) or [file an issue](https://github.com/langchain-ai/docs/issues/new/choose).